
The Best Fluffy Pancakes recipe you will fall in love with. Full of tips and tricks to help you make the best pancakes.

Cold Italian Grinder Pasta Salad

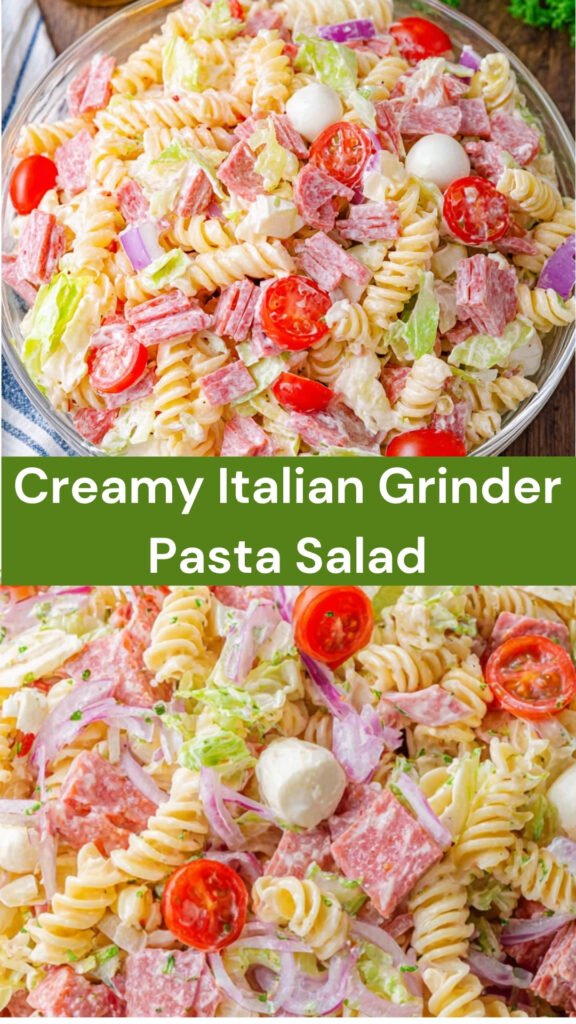
This Italian Grinder Pasta Salad delivers a satisfying cold lunch option, combining the hearty elements of a classic grinder sandwich into a convenient pasta dish. It’s built around tender rotini pasta, a creamy dressing, and a mix of deli meats and fresh vegetables, offering a portable meal that’s full of distinct textures.
Designed for busy weeknights, this recipe streamlines meal prep by focusing on simple assembly and a crucial chilling period, ensuring that the ingredients have time to develop their full potential. The practical approach includes a key step: holding back the lettuce until serving, which keeps it crisp and makes for a better eating experience.

What You’ll Need
The success of any pasta salad lies in its components, and for this Italian Grinder Pasta Salad, a specific combination of ingredients creates a balanced and flavorful profile. We build on rotini pasta, which is excellent for catching the creamy dressing, and then layer in classic deli ingredients and some brighter elements.
- For the dressing:
- 1 ⅓ cups mayonnaise
- ⅓ cup red wine vinegar
- 1 Tablespoon of peperoncini pepper juice from the jar
- Marinade oil leftover from the marinated mozzarella balls, use all the oil from both containers
- ½ teaspoon fresh black pepper
- 1 teaspoon salt
- 1 teaspoon oregano
- 1 teaspoon garlic powder
- ½ teaspoon red pepper flakes, optional
- For the salad:
- 1 pound rotini pasta, cooked until al dente
- 2 8-ounce containers marinated mozzarella cheese balls in oil, sliced into quarters
- 5–6 peperoncini peppers, sliced in rings
- 10-ounce container cherry tomatoes, cut in half, or cut in quarters depending on size
- 1 cup pickled red onion
- 10 slices deli Genoa salami, cut into chunks
- 8 slices deli ham, cut into chunks
- 20 slices pepperoni, cut into quarters
- ½ head lettuce, shredded
Notice the inclusion of marinated mozzarella balls and their oil. This marinade oil is not just for the cheese; it’s a key ingredient in our dressing, adding depth and a subtle herby kick that ties the salad together. Similarly, peperoncini peppers contribute a pleasant tang and a mild heat, with their juice joining the dressing mix. These careful inclusions make a significant difference to the overall flavor.
How to Make It
Making this pasta salad lunch is a straightforward process, primarily involving mixing and chilling. The steps ensure each component is properly incorporated and that the salad has adequate time to develop its full flavor and texture before serving.
- In a medium bowl, thoroughly whisk together the mayonnaise, red wine vinegar, peperoncini juice, all the marinade oil from the mozzarella balls, black pepper, salt, oregano, garlic powder, and the optional red pepper flakes until the dressing is completely smooth.
- Take a very large bowl and add the cooked rotini pasta, the sliced marinated mozzarella balls, the sliced peperoncini peppers, halved or quartered cherry tomatoes, pickled red onion, the chunks of Genoa salami, deli ham, and quartered pepperoni. Make sure to hold off on adding the shredded lettuce at this stage.
- Pour the prepared dressing over the ingredients in the large bowl. Stir everything gently but thoroughly, ensuring all the pasta and other components are evenly coated. Cover the bowl tightly and refrigerate for a minimum of 2 hours. This chill time is essential for the flavors.
- Just before you are ready to serve the pasta salad, add the shredded lettuce to the chilled mixture. Stir it in gently to combine.
Why the Chill Matters
The Italian Grinder Pasta Salad requires a specific 2 hours of chill time after assembly and before adding the lettuce. This isn’t just about serving temperature; it’s a critical step that allows the dressing to fully penetrate the pasta and other ingredients.
During this period, the flavors from the dressing — including the zesty red wine vinegar, the savory mozzarella marinade oil, and the subtle spices — are absorbed by the rotini pasta. This resting period also allows the various deli meats and vegetables to slightly soften and integrate with the dressing, resulting in a more cohesive and satisfying salad. Without adequate chilling, the salad can taste less developed and the textures might not be as uniform.
Add Lettuce Last
One of the most important practical tips for this cold pasta salad revolves around when to add the shredded lettuce. It is essential to mix in the lettuce only right before you plan to serve the salad, not at the beginning of the preparation process.
If added too early, especially before the two-hour chilling period, the lettuce can become soggy and wilted due to the moisture from the dressing and the cold temperature. Adding it just before serving ensures that the lettuce retains its crisp texture, providing a fresh contrast to the other ingredients and enhancing the overall enjoyment of the dish.
Supported Swaps
While this lunch pasta salad recipe is designed with specific ingredients, some practical substitutions can be made if certain items are unavailable. These swaps maintain the integrity of the dish without compromising its core flavor or texture.
- If you cannot find marinated mozzarella balls, plain mozzarella balls or a block of whole mozzarella cut into bite-sized chunks will work. There’s no need to add extra oil if you use these alternatives since the recipe specifies using the marinade oil from the prepared balls.
- For the pickled red onion, if it is unavailable, a finely diced fresh red onion can be used as a substitute. The flavor profile will be slightly different, but it will still provide a good textural and taste contrast.
- Should cherry tomatoes not be accessible, a large diced tomato can be used instead. The key is to cut the tomato into pieces that are roughly the same size as the cherry tomatoes would have been, ensuring even distribution throughout the salad.
How to Store It
Proper storage is important to keep your Italian Grinder Pasta Salad fresh and enjoyable. Due to the nature of its ingredients and dressing, specific handling is recommended to ensure quality over time.
Store any leftovers in an airtight container in the refrigerator for up to 2 days. Since this is a cold pasta salad, it is not designed to be reheated. Reheating can negatively affect the texture of the pasta and other ingredients. Freezing is also not recommended for this recipe, as it can cause the dressing to separate and alter the texture of the vegetables and pasta upon thawing, leading to a less appealing dish.
Frequently Asked Questions
Can Italian Grinder Pasta Salad be made ahead?
Yes, this pasta salad can be made ahead. It requires a minimum of 2 hours chill time before serving, which allows the flavors to deepen effectively. Just remember to add the shredded lettuce right before you plan to eat it to keep it crisp.
When should you add the lettuce?
The lettuce should always be added at the last moment, precisely when you are ready to serve the pasta salad. This prevents it from wilting and becoming soggy from the dressing or the cold refrigerator environment.
How long does Italian Grinder Pasta Salad last?
When stored correctly in an airtight container in the refrigerator, the Italian Grinder Pasta Salad will maintain its quality for up to 2 days. Freezing is not recommended, as it can compromise the texture and overall quality of the dish.
Conclusion
The Italian Grinder Pasta Salad offers a practical and flavorful option for a cold lunch. By adhering to key steps, like allowing the dressed pasta mixture its full 2-hour chill time and adding the shredded lettuce only just before serving, you ensure the best possible texture and flavor. This approach helps maintain the freshness and integrity of every component, making it a reliable choice for your meal prep needs.
Print
Italian Grinder Pasta Salad
- Total Time: 30
- Yield: 8
- Diet: Vegetarian
Description
A hearty and satisfying cold pasta salad that combines flavors and textures of a classic Italian grinder sandwich in a portable, easy-to-serve format. Perfect for busy weeknights or lunchtime.
Ingredients
1 ⅓ cups mayonnaise
⅓ cup red wine vinegar
1 Tablespoon peperoncini pepper juice
Marinade oil from marinated mozzarella balls (from two 8-ounce containers), all used
½ teaspoon fresh black pepper
1 teaspoon salt
1 teaspoon oregano
1 teaspoon garlic powder
½ teaspoon red pepper flakes, optional
1 pound rotini pasta, cooked al dente
2 8-ounce containers marinated mozzarella cheese balls in oil, sliced into quarters
5–6 peperoncini peppers, sliced into rings
10-ounce container cherry tomatoes, halved or quartered
1 cup pickled red onion
10 slices deli Genoa salami, cut into chunks
20 slices pepperoni, cut into quarters
½ head lettuce, shredded
Instructions
In a medium bowl, whisk together the mayonnaise, red wine vinegar, peperoncini juice, marinade oil from the mozzarella, black pepper, salt, oregano, garlic powder, and red pepper flakes (if using).
In a large bowl, combine the cooked rotini pasta, mozzarella cheese balls, peperoncini peppers, cherry tomatoes, pickled red onion, salami, and pepperoni.
Pour the dressing over the pasta mixture and toss until well combined.
Refrigerate the pasta salad for at least 2 hours to allow the flavors to meld.
Before serving, gently mix in the shredded lettuce to maintain its crispness.
Notes
The marinated mozzarella oil adds depth to the dressing, so don’t skip it.
Chilling the salad is crucial for the best flavor development.
Shred the lettuce just before serving for maximum freshness.
Can be made ahead and stored in the refrigerator for up to 24 hours.
- Prep Time: 20
- Cook Time: 10
- Category: Lunch
- Method: Cold Salad
- Cuisine: Italian


